'%3e%3cg%20filter='url(%23filter0_i_679_862)'%3e%3ccircle%20cx='47.3083'%20cy='88.4997'%20r='11.3083'%20fill='url(%23paint0_radial_679_862)'/%3e%3c/g%3e%3ccircle%20cx='50.0719'%20cy='91.9742'%20r='4.025'%20fill='%231B1B1B'/%3e%3cg%20style='mix-blend-mode:color-dodge'%3e%3ccircle%20cx='47.3893'%20cy='90.0612'%20r='1.91667'%20fill='%23D9D9D9'/%3e%3c/g%3e%3c/g%3e%3cg%20clip-path='url(%23clip1_679_862)'%3e%3cg%20filter='url(%23filter1_i_679_862)'%3e%3ccircle%20cx='81.6443'%20cy='88.4997'%20r='11.3083'%20fill='url(%23paint1_radial_679_862)'/%3e%3c/g%3e%3ccircle%20cx='84.4039'%20cy='91.9742'%20r='4.025'%20fill='%231B1B1B'/%3e%3cg%20style='mix-blend-mode:color-dodge'%3e%3ccircle%20cx='81.7214'%20cy='90.0612'%20r='1.91667'%20fill='%23D9D9D9'/%3e%3c/g%3e%3c/g%3e%3cdefs%3e%3cfilter%20id='filter0_i_679_862'%20x='36'%20y='75.1711'%20width='23.6273'%20height='24.6375'%20filterUnits='userSpaceOnUse'%20color-interpolation-filters='sRGB'%3e%3cfeFlood%20flood-opacity='0'%20result='BackgroundImageFix'/%3e%3cfeBlend%20mode='normal'%20in='SourceGraphic'%20in2='BackgroundImageFix'%20result='shape'/%3e%3cfeColorMatrix%20in='SourceAlpha'%20type='matrix'%20values='0%200%200%200%200%200%200%200%200%200%200%200%200%200%200%200%200%200%20127%200'%20result='hardAlpha'/%3e%3cfeOffset%20dx='1.01015'%20dy='-2.02031'/%3e%3cfeGaussianBlur%20stdDeviation='1.01015'/%3e%3cfeComposite%20in2='hardAlpha'%20operator='arithmetic'%20k2='-1'%20k3='1'/%3e%3cfeColorMatrix%20type='matrix'%20values='0%200%200%200%200%200%200%200%200%200%200%200%200%200%200%200%200%200%200.15%200'/%3e%3cfeBlend%20mode='normal'%20in2='shape'%20result='effect1_innerShadow_679_862'/%3e%3c/filter%3e%3cfilter%20id='filter1_i_679_862'%20x='70.3359'%20y='75.1711'%20width='23.6273'%20height='24.6375'%20filterUnits='userSpaceOnUse'%20color-interpolation-filters='sRGB'%3e%3cfeFlood%20flood-opacity='0'%20result='BackgroundImageFix'/%3e%3cfeBlend%20mode='normal'%20in='SourceGraphic'%20in2='BackgroundImageFix'%20result='shape'/%3e%3cfeColorMatrix%20in='SourceAlpha'%20type='matrix'%20values='0%200%200%200%200%200%200%200%200%200%200%200%200%200%200%200%200%200%20127%200'%20result='hardAlpha'/%3e%3cfeOffset%20dx='1.01015'%20dy='-2.02031'/%3e%3cfeGaussianBlur%20stdDeviation='1.01015'/%3e%3cfeComposite%20in2='hardAlpha'%20operator='arithmetic'%20k2='-1'%20k3='1'/%3e%3cfeColorMatrix%20type='matrix'%20values='0%200%200%200%200%200%200%200%200%200%200%200%200%200%200%200%200%200%200.15%200'/%3e%3cfeBlend%20mode='normal'%20in2='shape'%20result='effect1_innerShadow_679_862'/%3e%3c/filter%3e%3cradialGradient%20id='paint0_radial_679_862'%20cx='0'%20cy='0'%20r='1'%20gradientUnits='userSpaceOnUse'%20gradientTransform='translate(47.3083%2088.4997)%20rotate(29.2803)%20scale(11.9552)'%3e%3cstop%20offset='0.634615'%20stop-color='white'/%3e%3cstop%20offset='1'%20stop-color='%23A8FFEA'/%3e%3c/radialGradient%3e%3cradialGradient%20id='paint1_radial_679_862'%20cx='0'%20cy='0'%20r='1'%20gradientUnits='userSpaceOnUse'%20gradientTransform='translate(81.6443%2088.4997)%20rotate(29.2803)%20scale(11.9552)'%3e%3cstop%20offset='0.634615'%20stop-color='white'/%3e%3cstop%20offset='1'%20stop-color='%23A8FFEA'/%3e%3c/radialGradient%3e%3cclipPath%20id='clip0_679_862'%3e%3crect%20width='22.6167'%20height='22.6167'%20fill='white'%20transform='translate(36%2077.1914)'/%3e%3c/clipPath%3e%3cclipPath%20id='clip1_679_862'%3e%3crect%20width='22.6167'%20height='22.6167'%20fill='white'%20transform='translate(70.3359%2077.1914)'/%3e%3c/clipPath%3e%3c/defs%3e%3c/svg%3e)
How to Import Transactions from a CSV File
Bring historical transactions into Moneko from a CSV or TSV export using the import wizard, with column mapping, duplicate detection, and preview review.
How to Import Transactions from a CSV File
CSV (comma-separated values) is the most common export format from budgeting apps, banks, and spreadsheet tools. Moneko's import wizard makes it straightforward to bring historical transactions in from a CSV, TSV, or TXT file.
What you need before importing
- A CSV, TSV, or TXT export from your bank, budgeting app, or spreadsheet.
- The file should contain at least a Date column and an Amount column (or separate Debit and Credit columns).
- Optional but helpful columns: Category, Description, Merchant, Currency, Type, Reference, and Balance.
- Save the file as UTF-8 encoding to avoid text-encoding errors.
If your tool exports in a proprietary format, open it in a spreadsheet app and re-save it as CSV before importing.
Step 1: Open the import wizard
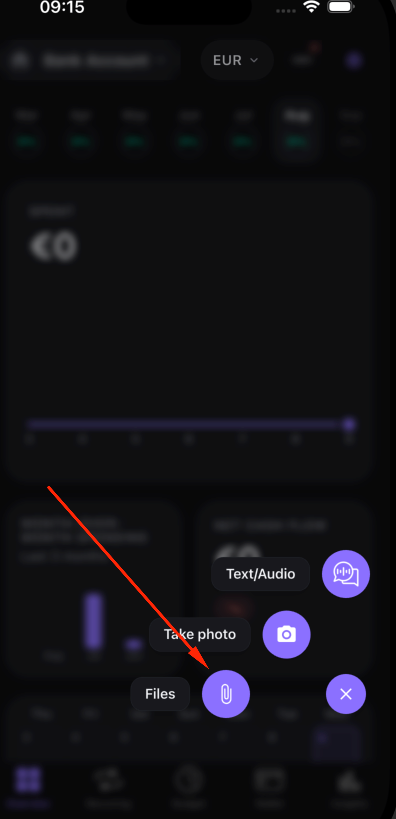
- Open the Home screen in the Moneko mobile app.
- Tap the AI capture button (the round action button).
- In the sheet that appears, choose Files.
The import wizard opens with a three-step timeline: Select File, Map Columns, Preview.
Step 2: Select a source and pick your file
- Choose the app you are importing from. Moneko supports YNAB, Monarch, Copilot, PocketGuard, Splitwise, EveryDollar, Cashew, Mint, Goodbudget, Spendee, and Other.
- A hint card tells you exactly which file to upload for that source.
- Tap the file row to open the file picker.
- Select your CSV, TSV, or TXT file.
Moneko parses the file locally and auto-maps the columns. If the mapping confidence is high and most sample rows parse cleanly, you skip straight to the preview. Otherwise, you land on the Map Columns step.
Step 3: Map columns (if needed)
If the auto-mapping confidence is low, you will see the Map Columns step.
Required fields:
- Date — the transaction date.
- Amount — the transaction amount, OR enable the Split Debit/Credit toggle and map both Debit (money out) and Credit (money in) columns. Moneko computes amount = credit − debit.
Optional fields:
- Category, Description, Merchant, Currency, Type (expense/income), Reference, and Balance.
To map a field:
- Tap the field row.
- Pick the matching column from the action sheet.
- Choose None to leave a field unmapped.
A format badge may appear showing the detected bank or app format (for example Chase, Bank of America, Wells Fargo, Revolut, N26, Wise, PayPal, or Debit/Credit Split). This confirms Moneko recognized the layout.
Tap Next when the required fields are mapped.
Step 4: Preview and confirm
The preview step is where you verify everything before saving.
Summary card:
- Total rows, valid rows, rows with errors, and duplicates.
- Choose where transactions go: your personal account or a shared household space.
- Pick the specific wallet/account that will receive the transactions. The list filters to accounts matching the currency of your rows.
Row list:
- Tap any row to open the edit sheet and fix the date, amount, category, description, merchant, currency, or income/expense type.
- When you change a category, Moneko offers to apply the same category to all matching transactions at once.
- Rows with errors are excluded from the import automatically.
Options:
- Skip Duplicates toggle (on by default) — rows that already exist in Moneko are not imported again.
- If the mapping step was auto-skipped, a banner lets you go back and review the mapping.
When you are ready, tap Import (N) to save the valid rows.
After the import
A progress dialog shows live status as Moneko saves rows in batches. When the import finishes, a completion dialog reports:
- Imported: rows successfully saved.
- Failed: rows that could not be saved.
- Duplicates: rows skipped because they already existed.
Moneko then refreshes your data so the new transactions appear immediately in your dashboard, analytics, and wallet balances.
CSV import tips
- Use UTF-8 encoding. If you get an encoding error, re-save the file as UTF-8 from your spreadsheet app.
- Unambiguous dates. Formats like YYYY-MM-DD reduce parsing errors. If a date fails, fix it in the preview edit sheet.
- One currency per file is cleanest. If your file has mixed currencies, map the Currency column so each row keeps its native currency.
- Split large files. Very large CSVs are processed in batches of 250 rows. If a file is extremely large, consider splitting it into smaller files for easier review.
- Export from the source, not a screenshot. Use the official CSV export from your bank or app rather than manually retyping data.
Troubleshooting CSV imports
| Problem | Solution |
|---|---|
| Encoding error | Re-save the file as UTF-8 encoding |
| Wrong columns mapped | Go back to Map Columns from the preview and re-map manually |
| Rows showing date errors | Tap the row in preview and fix the date format |
| Rows showing amount errors | Tap the row and fix the amount, or check for non-numeric characters |
| Too many duplicates flagged | Turn off Skip Duplicates if you confirmed the rows are genuinely missing |
| Session expired | Sign back into Moneko and retry the import |
Related help
Frequently Asked Questions
Moneko accepts CSV (comma-separated), TSV (tab-separated), and TXT (plain text delimited) files. The import wizard auto-detects the delimiter, so you do not need to configure it manually.