'%3e%3cg%20filter='url(%23filter0_i_679_862)'%3e%3ccircle%20cx='47.3083'%20cy='88.4997'%20r='11.3083'%20fill='url(%23paint0_radial_679_862)'/%3e%3c/g%3e%3ccircle%20cx='50.0719'%20cy='91.9742'%20r='4.025'%20fill='%231B1B1B'/%3e%3cg%20style='mix-blend-mode:color-dodge'%3e%3ccircle%20cx='47.3893'%20cy='90.0612'%20r='1.91667'%20fill='%23D9D9D9'/%3e%3c/g%3e%3c/g%3e%3cg%20clip-path='url(%23clip1_679_862)'%3e%3cg%20filter='url(%23filter1_i_679_862)'%3e%3ccircle%20cx='81.6443'%20cy='88.4997'%20r='11.3083'%20fill='url(%23paint1_radial_679_862)'/%3e%3c/g%3e%3ccircle%20cx='84.4039'%20cy='91.9742'%20r='4.025'%20fill='%231B1B1B'/%3e%3cg%20style='mix-blend-mode:color-dodge'%3e%3ccircle%20cx='81.7214'%20cy='90.0612'%20r='1.91667'%20fill='%23D9D9D9'/%3e%3c/g%3e%3c/g%3e%3cdefs%3e%3cfilter%20id='filter0_i_679_862'%20x='36'%20y='75.1711'%20width='23.6273'%20height='24.6375'%20filterUnits='userSpaceOnUse'%20color-interpolation-filters='sRGB'%3e%3cfeFlood%20flood-opacity='0'%20result='BackgroundImageFix'/%3e%3cfeBlend%20mode='normal'%20in='SourceGraphic'%20in2='BackgroundImageFix'%20result='shape'/%3e%3cfeColorMatrix%20in='SourceAlpha'%20type='matrix'%20values='0%200%200%200%200%200%200%200%200%200%200%200%200%200%200%200%200%200%20127%200'%20result='hardAlpha'/%3e%3cfeOffset%20dx='1.01015'%20dy='-2.02031'/%3e%3cfeGaussianBlur%20stdDeviation='1.01015'/%3e%3cfeComposite%20in2='hardAlpha'%20operator='arithmetic'%20k2='-1'%20k3='1'/%3e%3cfeColorMatrix%20type='matrix'%20values='0%200%200%200%200%200%200%200%200%200%200%200%200%200%200%200%200%200%200.15%200'/%3e%3cfeBlend%20mode='normal'%20in2='shape'%20result='effect1_innerShadow_679_862'/%3e%3c/filter%3e%3cfilter%20id='filter1_i_679_862'%20x='70.3359'%20y='75.1711'%20width='23.6273'%20height='24.6375'%20filterUnits='userSpaceOnUse'%20color-interpolation-filters='sRGB'%3e%3cfeFlood%20flood-opacity='0'%20result='BackgroundImageFix'/%3e%3cfeBlend%20mode='normal'%20in='SourceGraphic'%20in2='BackgroundImageFix'%20result='shape'/%3e%3cfeColorMatrix%20in='SourceAlpha'%20type='matrix'%20values='0%200%200%200%200%200%200%200%200%200%200%200%200%200%200%200%200%200%20127%200'%20result='hardAlpha'/%3e%3cfeOffset%20dx='1.01015'%20dy='-2.02031'/%3e%3cfeGaussianBlur%20stdDeviation='1.01015'/%3e%3cfeComposite%20in2='hardAlpha'%20operator='arithmetic'%20k2='-1'%20k3='1'/%3e%3cfeColorMatrix%20type='matrix'%20values='0%200%200%200%200%200%200%200%200%200%200%200%200%200%200%200%200%200%200.15%200'/%3e%3cfeBlend%20mode='normal'%20in2='shape'%20result='effect1_innerShadow_679_862'/%3e%3c/filter%3e%3cradialGradient%20id='paint0_radial_679_862'%20cx='0'%20cy='0'%20r='1'%20gradientUnits='userSpaceOnUse'%20gradientTransform='translate(47.3083%2088.4997)%20rotate(29.2803)%20scale(11.9552)'%3e%3cstop%20offset='0.634615'%20stop-color='white'/%3e%3cstop%20offset='1'%20stop-color='%23A8FFEA'/%3e%3c/radialGradient%3e%3cradialGradient%20id='paint1_radial_679_862'%20cx='0'%20cy='0'%20r='1'%20gradientUnits='userSpaceOnUse'%20gradientTransform='translate(81.6443%2088.4997)%20rotate(29.2803)%20scale(11.9552)'%3e%3cstop%20offset='0.634615'%20stop-color='white'/%3e%3cstop%20offset='1'%20stop-color='%23A8FFEA'/%3e%3c/radialGradient%3e%3cclipPath%20id='clip0_679_862'%3e%3crect%20width='22.6167'%20height='22.6167'%20fill='white'%20transform='translate(36%2077.1914)'/%3e%3c/clipPath%3e%3cclipPath%20id='clip1_679_862'%3e%3crect%20width='22.6167'%20height='22.6167'%20fill='white'%20transform='translate(70.3359%2077.1914)'/%3e%3c/clipPath%3e%3c/defs%3e%3c/svg%3e)


What is Email Receipt Capture?
Email receipt capture is a simple way to log online purchases without typing everything by hand.
Instead of opening Moneko and entering the merchant, amount, date, category, and wallet yourself, you can forward a receipt email to Moneko. Moneko reads the key details, records the transaction, and lets you know when it is ready.
It is especially useful for:
- Online shopping receipts
- Travel bookings
- Subscription invoices
- App store receipts
- Digital bills
- CSV, XLS, XLSX, or PDF attachments you want to record
The setup only takes a few minutes.
Step 1: Open Email Receipt Capture
In Moneko, go to your profile settings and open Email receipt capture.
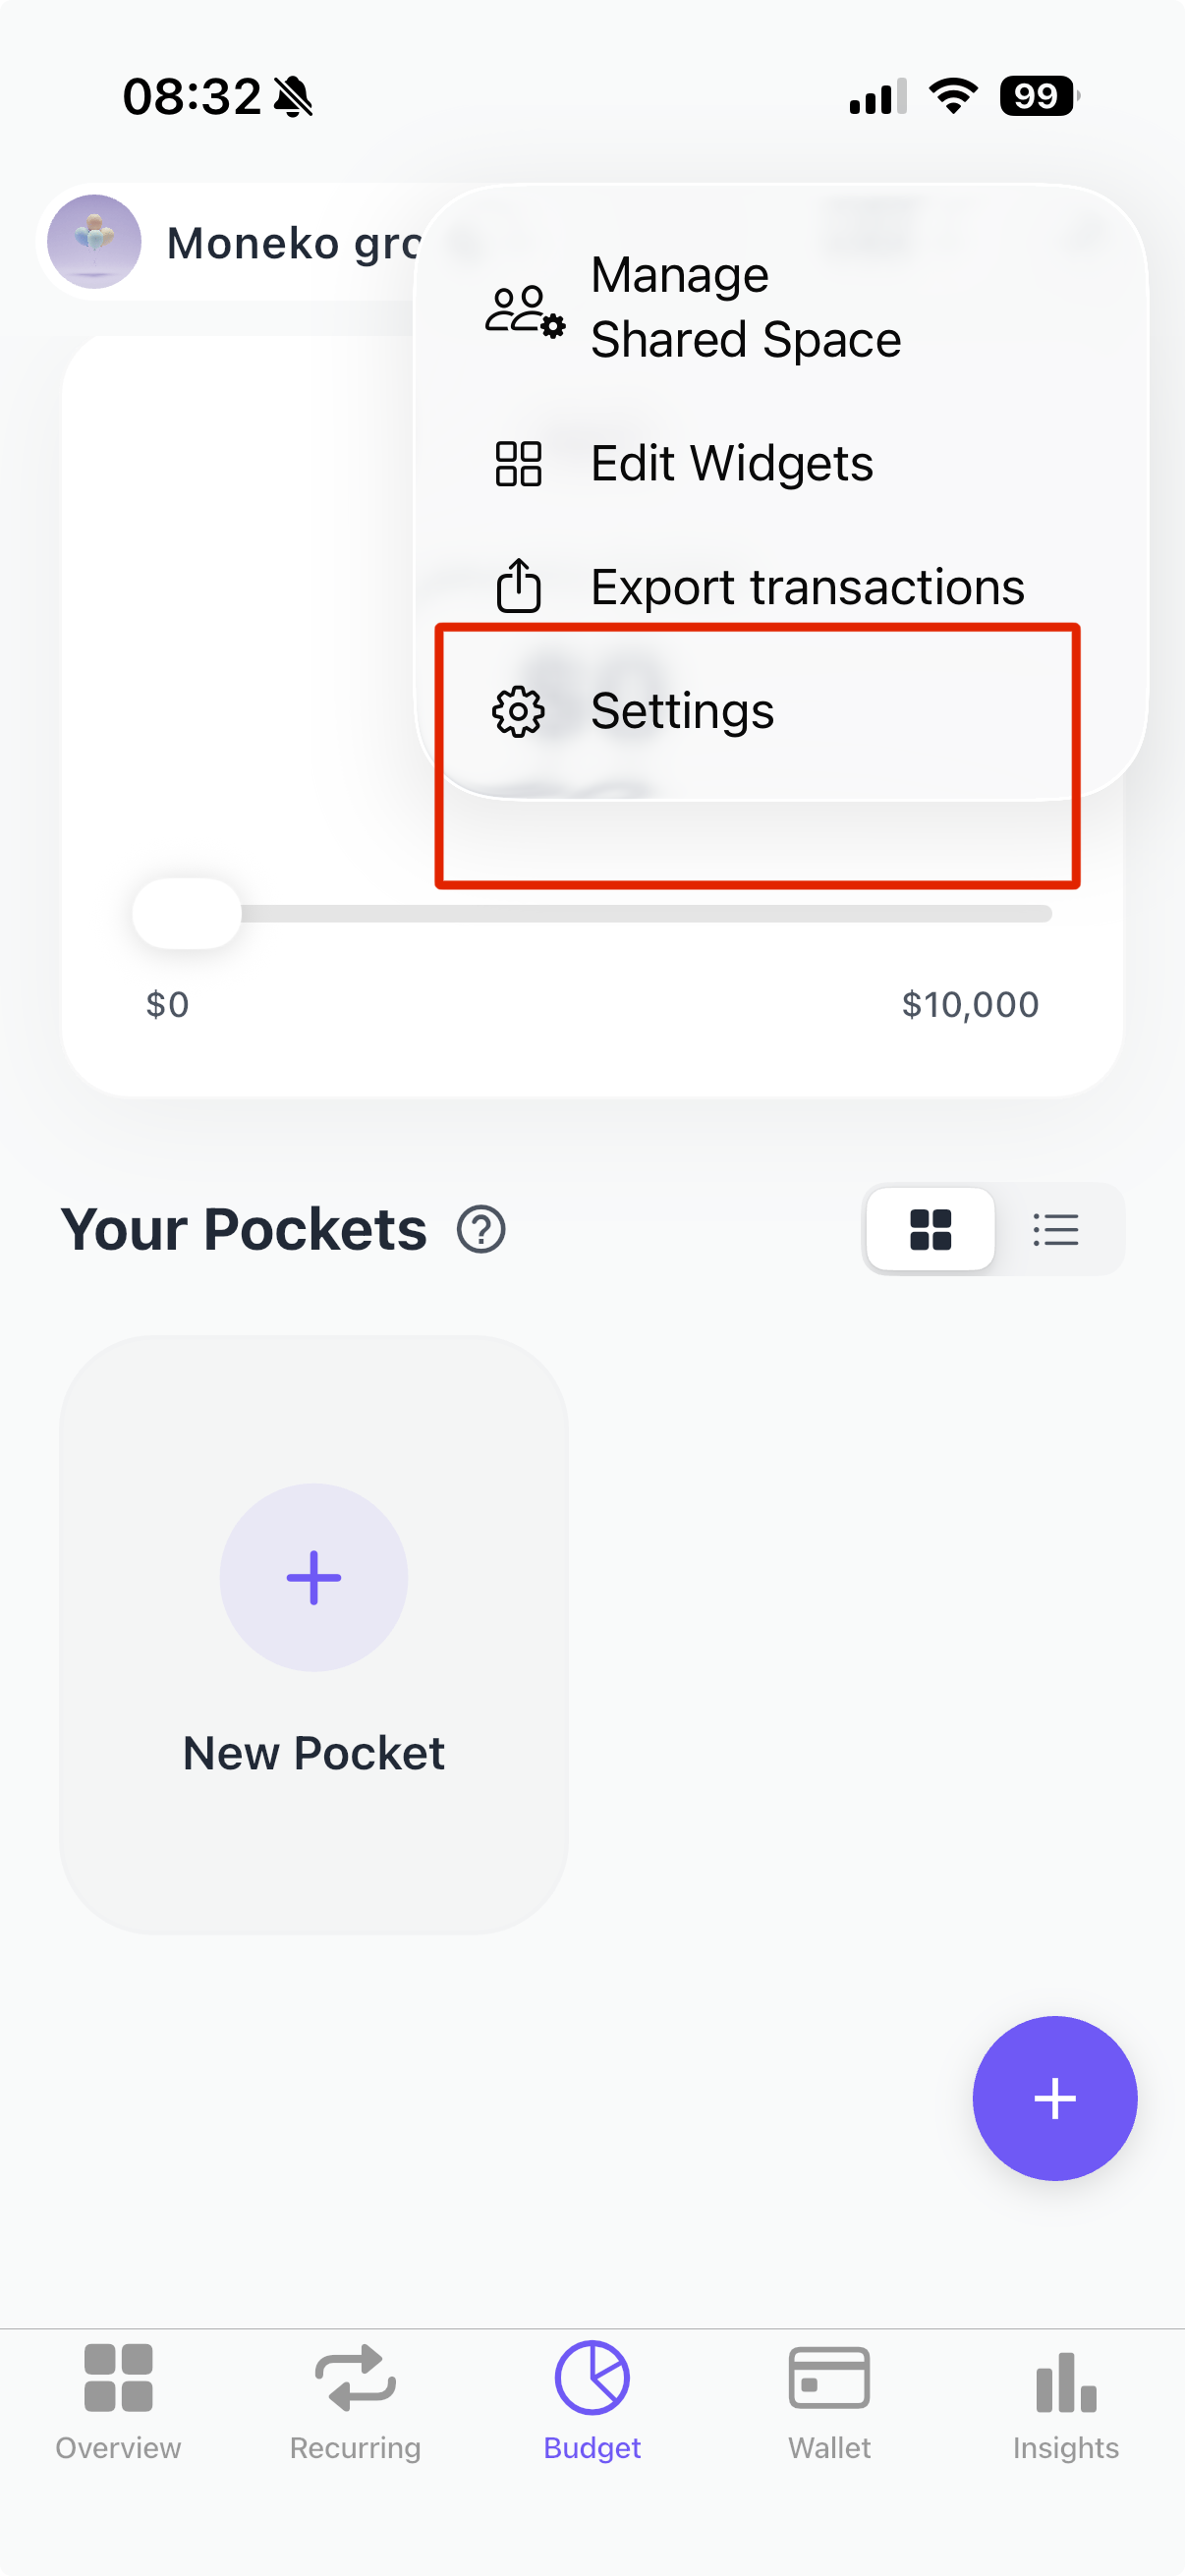
Navigate to Profile Settings
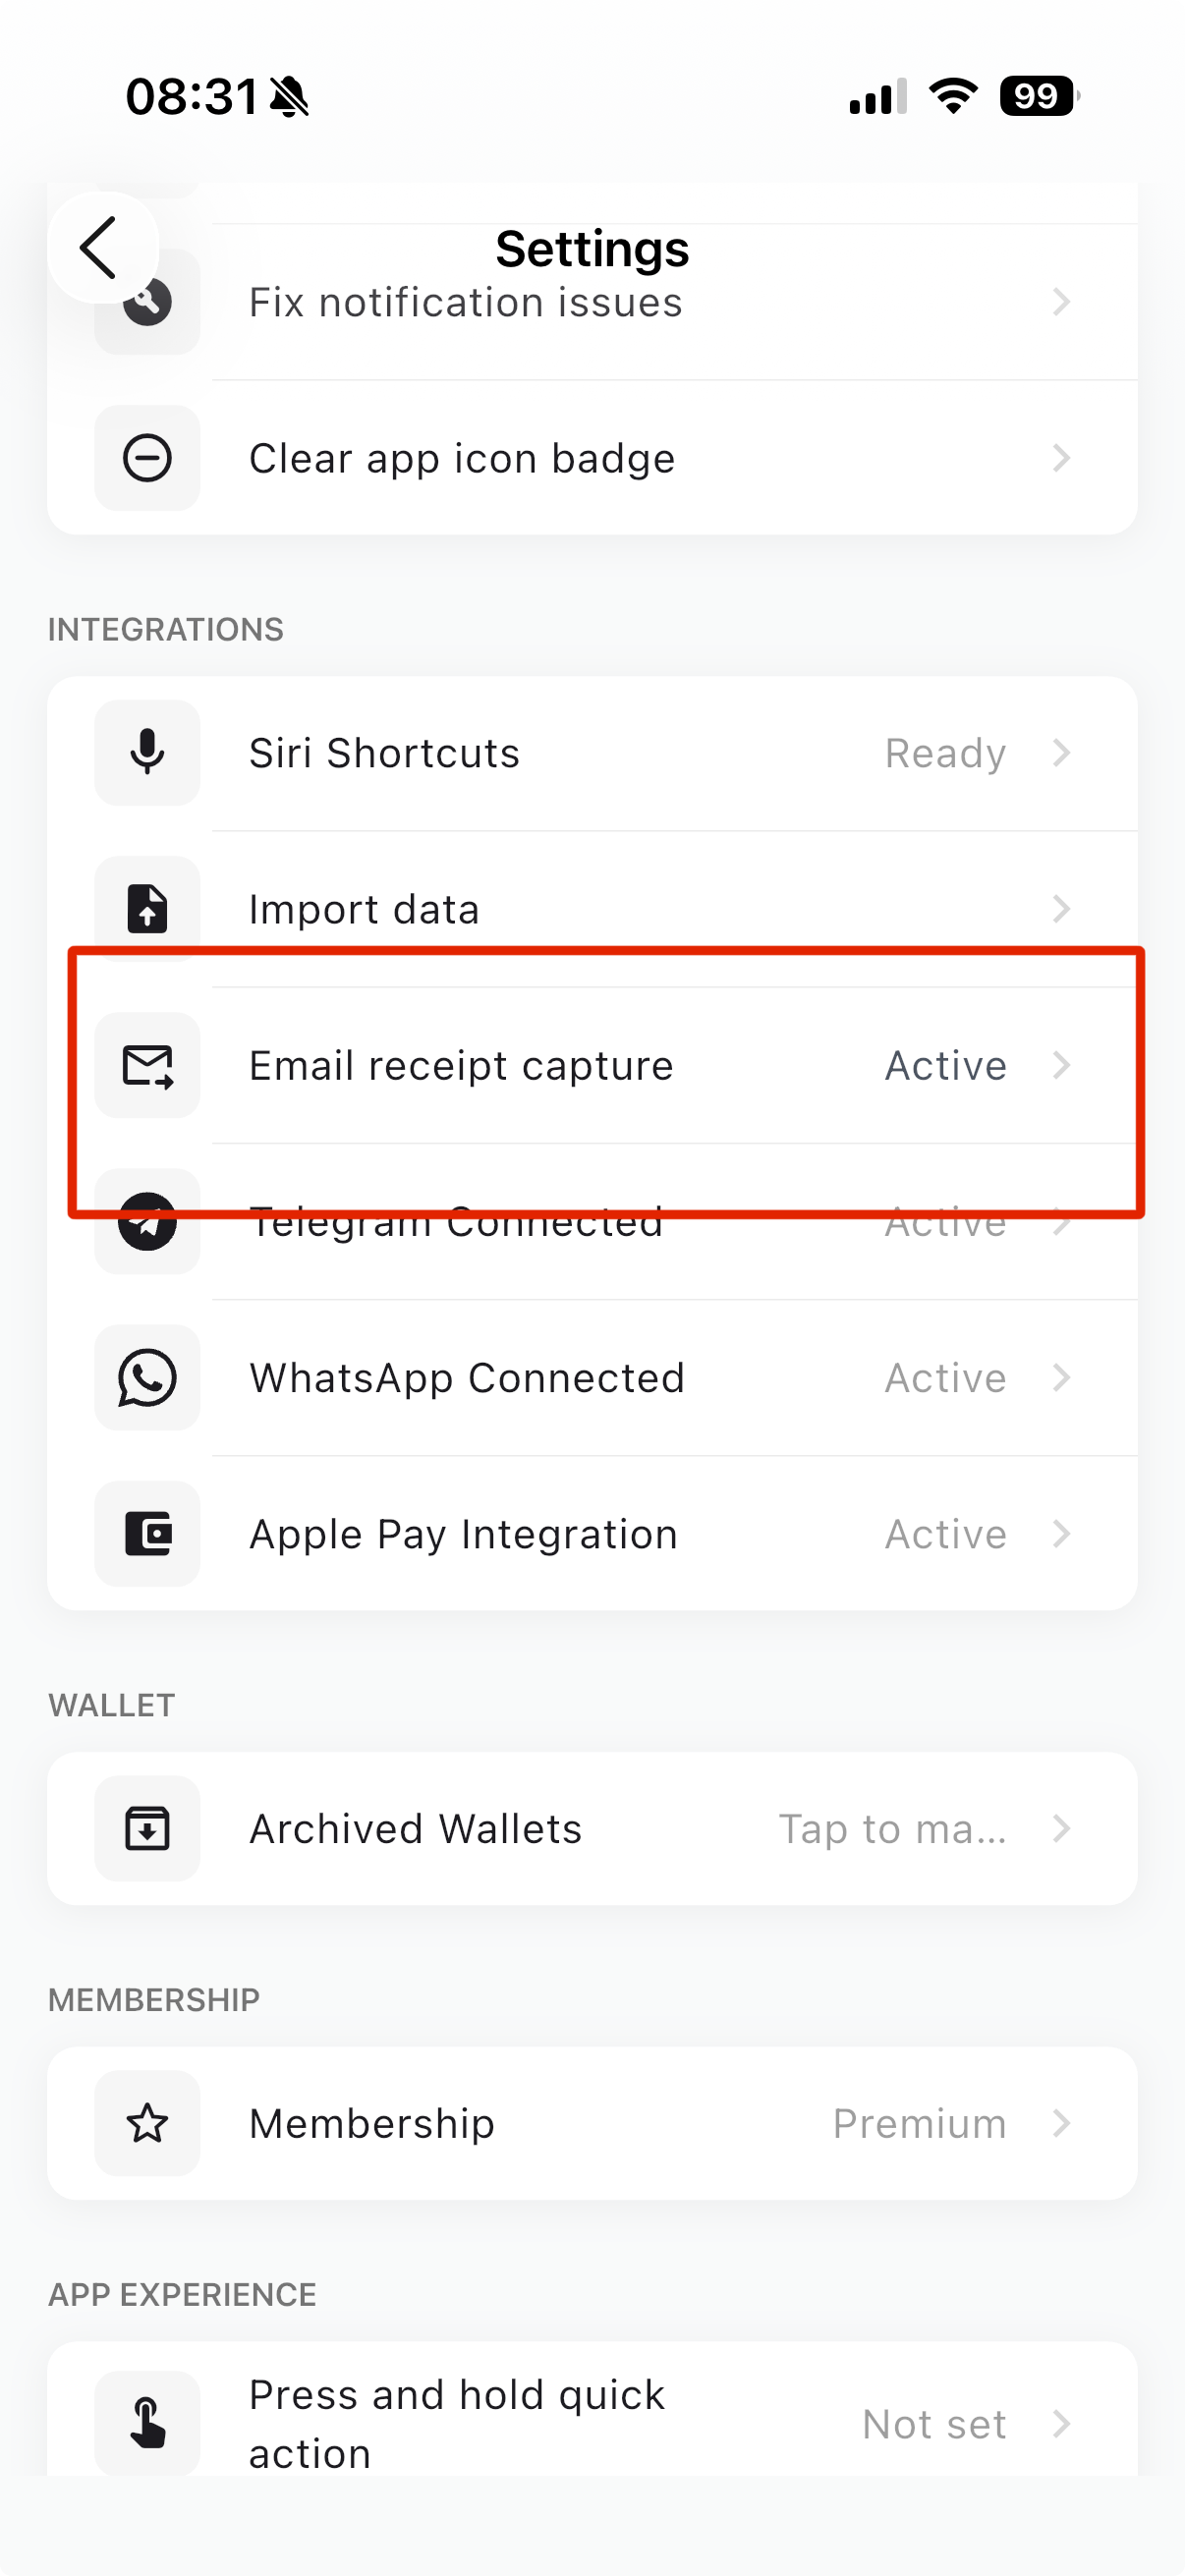
Email Receipt Capture Setup
You will see the setup page with a short explanation: forward your online purchase receipts and Moneko will log them automatically.
This page has three important areas:
- Setup: Turn the feature on and choose where transactions should be saved.
- Forwarding: Copy the Moneko forwarding email address.
- Approved senders: Decide which email addresses are allowed to send receipts.
Step 2: Turn On Email Receipt Capture
Switch on Email receipt capture.
Once enabled, Moneko will be ready to accept receipts from your approved email addresses. This keeps the feature intentional and secure, because Moneko only processes receipts from senders you have approved.
Step 3: Choose Your Default Space
Next, choose the Default space.
This tells Moneko where automatically captured transactions should go. For example, you can send receipts to:
- Your personal space
- A shared household
- A portfolio or business-style space, if you use one
If most of your online purchases are personal, choose Personal. If you are tracking family spending with someone else, choose your shared household instead.
Step 4: Choose Your Default Wallet
After choosing a space, choose the Default wallet.
This is the wallet Moneko will use when it saves transactions from forwarded receipts. Pick the wallet that best matches how you usually pay online, such as your main card, current account, or spending wallet.
You can always adjust the transaction later if a receipt belongs somewhere else.
Step 5: Copy the Forwarding Email
In the Forwarding section, copy the Moneko forwarding address:
This is the email address you will forward receipts to.
A good tip is to save it as a contact called Moneko Receipts in your email app. That makes it easier to forward receipts quickly from Gmail, Outlook, Apple Mail, or any other inbox.
Step 6: Add Approved Senders
Moneko protects your account by only processing attachments from approved senders.
Your Moneko account email is included by default. If you receive shopping receipts at another email address, tap Add under Approved senders and enter that email address.
For example, you may want to add:
- Your personal shopping email
- A shared household email
- A work or business receipt email
- A secondary inbox used for subscriptions
Only receipts forwarded from approved sender addresses can be processed by Moneko.
Step 7: Forward Your First Receipt
Now send a test receipt.
Open a receipt email from an approved sender and forward it to:
You can forward the email itself or include a supported attachment. Moneko supports PDF, CSV, XLS, and XLSX files.
After Moneko receives it, the app extracts the useful details and records the transaction in your selected space and wallet.
What Happens Next?
Once the receipt is processed and added to your Moneko account, Moneko sends a confirmation email and a phone notification.
That means you do not need to keep checking manually. Forward the receipt, let Moneko handle the details, and review the result when it is ready.
A Simple Example
Imagine you buy a pair of headphones online.
Normally, you might need to open your budgeting app, type the store name, enter the amount, choose a category, pick the wallet, and save it.
With email receipt capture, the flow is much lighter:
- Buy something online.
- Receive the receipt in your inbox.
- Forward it to [email protected].
- Moneko reads the receipt and logs the transaction.
- You get notified when it is done.
That is it.
Tips for Best Results
- Forward receipts from an approved sender email.
- Make sure the receipt includes the merchant, date, and amount.
- Use PDF, CSV, XLS, or XLSX attachments when available.
- Choose the right default wallet before forwarding lots of receipts.
- Add extra approved senders if you use more than one shopping inbox.
Why This Matters
Small purchases are easy to miss. Online orders, subscriptions, delivery apps, and travel bookings can quickly pile up, especially when receipts are scattered across your inbox.
Email receipt capture helps close that gap. Instead of relying on memory, you can forward receipts as they arrive and keep your Moneko records up to date with much less effort.
It is not just about saving time. It is about making your money picture cleaner, calmer, and easier to trust.
The Moneko Takeaway
Moneko email receipt capture turns your inbox into a simple transaction source.
Enable the feature, choose your default space and wallet, approve your sender emails, then forward receipts to [email protected] whenever you want Moneko to log them automatically.
No manual entry. No hunting through old receipts. Just forward the email and let Moneko do the rest.
